The sketchfab exporter for 3dsMax has gotten a nice update. I’ve worked on it over the last couple of months with the help of a few users on sketchfab. Apart from a bunch of bugfixes the main new features are:
- Support for VRay Next
- Support for Corona
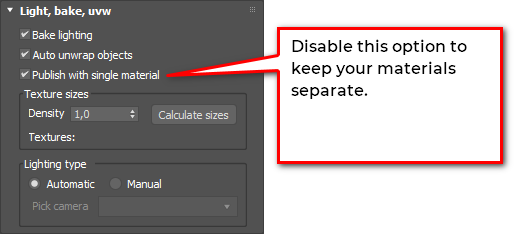
- Keep materials separate in the sketchfab editor
- Multiple UV channels
The first two should be self explanatory. These two render engines are now supported in addition to Mental Ray and scanline.
I’ve used the low poly sushi set from tactical-destruction and remixed it a bit.
Keep materials separate
Until now, when using the exporter to bake textures, all materials would be merged into a single material. You’d end up with one baked texture and one material in the sketchfab editor. While this is fast and easy to edit. It’s also a bit limited. With this new feature the exporter still bakes a single texture but it keeps the materials separate. This enables you to edit the materials in the sketchfab editor independently while still sharing the same base color texture. When baking a building for instance, you can make the glass transparent and reflective and make the bricks rough and opaque.

This video tutorial shows you how to lightbake your scene and edit the separated materials in the sketchfab editor.
You can enable this feature by unchecking the “Publish with single material”. Check out this example. Do you notice how the sauce bottle is very glossy, while the wooden plate is not? They’re separate materials. But they share a single baked texture.
Multiple UV channels
This feature is something you don’t need to turn on. From now on, your existing UV channels won’t be erased from your models when you upload them. When you bake a texture, it gets an additional UV channel. This is very handy when you use opacity maps on your models. Opacity maps are ignored when baking a lightmap. Once baked and uploaded, you can upload your original opacity map and apply it to your model because the original UV channel is retained.
This feature also allows you to use the sketchfab exporter for pure lightmap baking. Normally, everything is baked into the lightmap: lighting and diffuse color. When you give your models a white material, you’re baking a pure lightmap. In the sketchfab editor you can add the original diffuse texture again and use the baked lightmap as AO map or cavity map.
This video tutorial shows you how to bake a lightmap and edit the colormap independently.
Check out this example which uses that approach.
Get the updated sketchfab exporter with the link at the top of the page, it’s free! If you’re interested in building configurators with sketchfab, take a look at optionsoptions. It’s a free script which helps you publish a configurator directly from within 3dsMax. If you’d like to hire me for a configurator project, feel free to drop me a line! Check out the Zodiac configurator or FDomes configurator I’ve built as samples of my work.

