Recently I’ve finished a project for a local client who needed to process a bunch of 3D models. Actually not that many, about one hundred of them but it’s a first batch of a model library of thousands of 3D models. Automation was required!
I had to make these high-res models which were intended for offline rendering suitable for realtime online use in a 3D web environment. It also included converting the materials. The output format was KMZ, which consists of a KML file (basically xml) with some data, a collada file with the mesh and the textures. Here I’d like to describe how I approached these tasks and kept it manageable.
Mesh compression
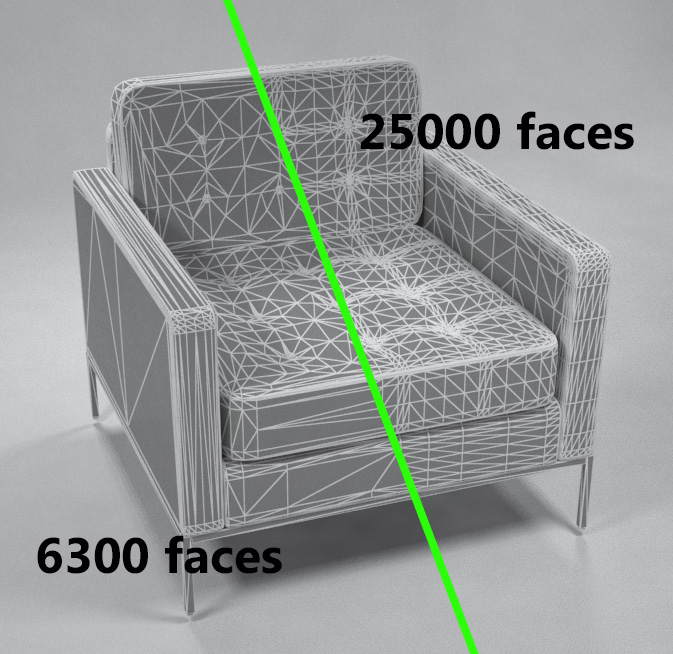
In 3ds Max there’s an excellent modifier which compresses meshes: pro-optimizer. You punch in a percentage you want to compress mesh with and it just works. However, the percentage you pick is very important. You can’t use the same rate of compression on different types of objects. In my case I was dealing with furniture. A box-like piece of furniture like a cupboard is already quite efficient in its mesh and can’t be compressed a lot. Organic shapes, like sofas and pillows have a very dense mesh and can be compressed a lot before the mesh breaks down. To manage these differences, I use an algorithm which determines the mesh density per square meter of surface area. Depending on this density the compression is adjusted: if there’s a low density, there’s less compression. If the density is high, the mesh is compressed more heavily. This results in good overall compression rates while not destroying meshes. Below are two examples of compression determined by this algorithm.


Material conversion
The realtime engine I was exporting to is very limited in its capabilities to render shaders. This makes converting shaders pretty easy because I can just pick the color or diffuse texture form the original shader and it’s done. On the other hand, a reduced shader has little options to resemble the actual material it represents. The choices the software makes should be just right. Since this is not always the case, I added an extra conversion idea for the materials. Materials can be converted to a predefined just-perfect material based on their names. Chrome or glass for instance are recurring materials and were named pretty consistently in the original files. I could just pick them out by their names and match them with my own predefined materials.
Tweaks
Automated processing is a joy to watch but there are always cases you’d like to customize. This is a real pain to manage if 10% of the models still needs manual tweaking. With thousands of models to process this has to be avoided at all costs. Manual tweaks aren’t repeatable efficiently and are a big cause of errors. To still accommodate the necessary tweaks I incorporated them in the automated process. The entire automation is managed by xml-data collected on the models. The xml-file can be edited to increase or decrease mesh compression, adjust shader colors or trigger name-based shader conversion. Storing the tweaks in the xml instead of in the model means the models can be consistently tweaked over and over again.


Output
Generating the final output is one thing, but each client also needs to see previews. For this cause I stored the faces before and after compression into a spreadsheet. Also the processed 3D model was privately uploaded to sketchfab for online realtime 3D inspection. Though any platform could be used which has an API to talk to. This data was presented to the client in a google sheet where all reviewable data was collected.

How about you?
Converting large amounts of 3D models is a common task. The steps I’ve described here might or might not be part of what you need. The pipeline I’ve set up is very flexible however. Different conversion steps can be plugged in to make it just right for you. Automating conversion prevents your 3D models to expire and helps you get most out of your investment.
